
Preface
So I’ve now figured out the hardware, built that and then installed the basics on the machine, I’m now at the point where I can begin building out the services I actually want to run on my homelab. As I’ve discussed previously I’m going to build out the majority of my applications using Docker as I like the ability to separate the running software from the underlying hardware, don’t require as much separation as a Linux container and I’m not currently looking to do high-availability as I’m just a single user who can fix stuff when I need to.
To get started with this there’s some prep work I need to do on my Docker virtual machine and also work out exactly how I want to run Docker. By that, I mean how my file structure is going to look, secrets, the structure of the Docker Compose files and Docker configuration.
Docker basics
This section is just a quick explainer on what docker actually does, as well as a list of common terms I’m going to be using throughout this documentation.
What is it?
Docker, in a nutshell, is a containerisation technology that allows programs to run on a host without impacting the host itself. This is important as it allows for more applications to be run on a single machine than was previously possible, without the worry that making a change to 1 system causes the machine to break and having to reinstall everything. Additionally, containers are designed to run the same way every time, meaning that tearing down and creating can be done easily. I think most of us building out servers not using containerisation to have broken due to a missing variable or typo in the configuration.
It’s also important to note, that Docker is not a virtual machine as a container does not contain an entire operating system, and instead relies on the kernel of the host. This has the benefit of faster runtimes and less resource intensive due to not having to bootup an entire operating system when run.
There are alternatives to docker, like podman that offer similar functionality, but Docker is currently the most popular
Terminology
I’m going to be mentioning a lot of terms for docker processes, this section is to quickly explain what I mean when I talk about it.
- docker compose
- This is a technology for me to run docker from a text file using YAML. It provides a way to repeatably run multiple complex docker containers using a single command.
- volumes
- These are essentially folders shared between the host and docker container. They also allow data to survive restarts
- networks
- by default, docker containers cannot talk to one another. However, this can be changed by using docker networks.
- sidecar
- Containers that run to support the main container. Examples of these include databases and backend servers.
- Dockerfiles
- blueprints for containers to be built
Docker config
Rules I’m following
While “rules” is a bit strong, this is a list of decisions I’ve made about how I want to run Docker on my Docker host
- applications that use sidecars are called
<application name>_<container name>to make it easy for me to tell what the container is and what it’s being used for. This is helpful as I can have several instances of the same container running for different services, like MySQL - I run multiple containers running the same database software, as opposed to a single container running all the databases
- This improves resiliency as if I break something, I can just replace the container rather than having to recover to save other applications
- There is a resource cost to this, but I do find that the typical software for these databases is pretty lightweight
- I use named volumes over host volumes
- Once again, it’s helpful to have an easy friendly name to a volume, so that I can be more certain of what I’m destroying if I need to reset
- The volumes I create are always placed in a custom location for easy access over
/etc/docker/whateverand allowing me to use the larger partition of/home - No containers with direct access over the public internet (i.e.: opening ports on my router)
- There are technologies to do this, like Cloudflare Tunnel, but this opens up security concerns that I’d prefer not to deal with just yet These include things like securing secrets and creating a segregated area of my network.
- Use the
docker composecommand overdocker-compose- The
docker-composecommand is an older version ofdocker composeand has several drawbacks.
- The
- Prefer documented configuration
- There are hundreds of ways to create a Docker compose definition, unless I specifically need to change something, I’m going to aim to mimic what the documentation says over heavily rationalizing my setup. This mainly comes into pinning version numbers over using the
latesttag. However, I will do things like moving to environment configuration over individual.envfiles and using named volumes
- There are hundreds of ways to create a Docker compose definition, unless I specifically need to change something, I’m going to aim to mimic what the documentation says over heavily rationalizing my setup. This mainly comes into pinning version numbers over using the
Location on disk
This was a fairly easy choice for me, as I decided to add a /home partition and expand it, this is the largest section of my drive, so I’m going to work within the /home drive.
File structure
This is actually really complicated given the various ways different maintainers choose to setup configuration. I was trying to keep as much information as possible in the docker compose file itself, but this was impossible at times due to the aforementioned configuration requirements. Additionally, some maintainers make it so that volumes are mounted that contain a mixture of config and application code that it can be difficult to separate. Additionally, this can be files that are generated on first boot and as such need to be avoided from adding directly as they can trick the application into not generating other needed config. This can also be made worse when certain applications require multiple containers working together to work for example, when a database is needed. Finally, there’s also config that needs to be changed once, and then should never be touched again, such as when building out auth providers.
Also, I’m running about 60 containers in my homelab, having all of this in a single file would be confusing and difficult to manage. So to avoid this, I’ve grouped my homelab into the following folders:
- networking
- things related to providing things like SSL certificates and VPN services
- auth
- centralized auth databases to simplify login
- management
- relates to containers that allow me to manage the environment and view logs etc.
- services
- similar to management, but more for standalone services that can enhance other containers or don’t fit in other categories
- recipes
- I like to cook, so applications that can manage recipes go here
- finance
- budgeting and personal finance programs
- media
- anything that allows me to consume content, be that reading, listening or watching etc.
- office
- applications useful for providing things that would be useful in an office, like task tracking and wiki’s
- monitoring
- once again similar to management, but provides a more general overview of things in my homelab.
I’ve tried to rationalize this, but as I’ve explained, it can be difficult to avoid. As such I try to keep as much configuration closer to the docker compose as I can, using environment variables and config files, while also having a centralized folder for container volumes. As such, the typical folder structure looks like the following:
bash
Docker compose structure
I use a few different config patterns in my docker compose, but typically they follow something like the example below:
yaml
Restart policy
By default, if the host restarts, docker container’s won’t. However, in normal operation this can happen pretty regularly to either the docker host, or the ultimate Proxmox host. As I want to be lazy and allow this to happen without having to restart all my containers I can set a restart policy for a container to make it restart if the Docker host is rebooted for any reason.
There are 2 main restart policies that I use to do this:
always- Will always start the container if the Docker host is rebooted
unless-stopped- If the container has been stopped manually, it won’t be started if the Docker host is rebooted
NOTE: there are others discussed here that can be useful in certain situations
I prefer to use the always command over unless-stopped, as if there is an issue, as I prefer to remove the container when there’s an issue over leaving it installed but down. This is because it causes a more cluttered interface and I only really need to see this when I’m looking directly at the Docker Compose rather than through a management interface. I can do this while still keeping this in my Docker Compose by just commenting out the services that are broken.
Secrets
To be clear, this section is about securing the secrets that my services use for configuration, rather than secrets that go across a network
From Hashicorp Vault to Docker secrets, I looked at a lot of different ways to store secrets securely on the machine, but they all essentially run into the same issue. If I want some way allow unattended reboots, the docker containers need access to the decryption keys to be able to access the secrets. Therefore, there still needs to be something on disk that lets a service access those secrets. There are large industry solutions to this problem, but they can take a lot of time to understand and setup. For example, every time a server using Hashicorp Vault reboots, 3 separate access keys are required to be entered to unlock the vault, though you can also save the keys to environment variables. Additionally, I don’t currently want to expose anything directly to the public internet, so I’m reasonably certain that my server will not be compromised (as long as I don’t do anything stupid). What this all means, is that I ultimately decided to use .env files while I was learning how to setup my first homelab. In the future, I will probably look into changing this but it works for now.
Using a .env file does feel like a dirty solution to this problem though, so I’m likely going to take another look at this later to see if there’s a better way to store secrets securely.
I do need to be clear, there are other benefits to using a proper secrets manager (like auditing), but the only person who should be accessing this stuff is me anyway.
For context, here are the various technologies I considered:
- Hashicorp Vault
- Aforementioned triple unlock and it’s a complex system to learn and understand
- Docker secrets
- requires Docker to be run in swarm mode, which disables the ability to build Dockerfiles from compose. I could work around this by using a registry (like Harbor), but I didn’t want to do this just yet as ultimately it would have to live on the same the machine.
- Given this tool is built into Docker, it works a little differently by essentially mounting a read-only file with the secret
- OpenBao
- This is an open source version of Hashicorp Vault (following the fallout from Hashicorp’s licence change)
- various password vault providers
- I’m going to use a self-hosted solution later on, and these are often paid-for solutions
- Infisical
- When I get around to getting all of this setup, I’m probably going to go with this solution, but it does still need a client id and secret injected into a
.envfile.
- When I get around to getting all of this setup, I’m probably going to go with this solution, but it does still need a client id and secret injected into a
Important commands
This is a list of commands I found useful while working with Docker that I found helpful for diagnosing issues and simplifying running.
docker compose up -d- This is a really common command. It essentially runs a Docker compose file from the directory I’m currently in, while the
-dmeans run detached
- This is a really common command. It essentially runs a Docker compose file from the directory I’m currently in, while the
docker restart <container>- restarts a specific container. Useful for forcing a container to restart when I’ve not made changes to the compose, such as settings changes in generated config files.
docker logs <container>- Opens up the standard out log file for the container. Useful for troubleshooting from an SSH session
grep -P '\x00' <docker location>/containers/**/*json.log- Occasionally, I would run into this issue, which is where an unexpected
0x00character is written into the docker logs, meaning they can’t be read from thedocker logscommand. This removes that character.
- Occasionally, I would run into this issue, which is where an unexpected
docker run --rm -it jonlabelle/network-tools- This runs the
jonlabelle/network-toolsDocker container into the console. This container has a load of networking toll built into it which I found really useful when I was trying to diagnose issues with networking
- This runs the
Installing docker
By default, Docker is not installed on a Debian machine and so needs to be added. Doing this is fairly straight forward, with instructions from Docker here, but for completeness I’ll show the steps here.
To start with, I need to SSH into the machine using SSH client (I use Tabby) in order to begin installing Docker. Just to make sure everything’s ready install, I update the machine:
bash
Now I’m ready to install the prerequisites for Docker:
bash
I can now install docker by installing the requisite packages:
bash
To verify the install is working, just run this command:
bash
Moving docker
Now that docker is installed, I want to take advantage of the fact that my /home partition is far larger than the partition it’s currently installed on. At this point in time, I don’t have any containers or images that I want to keep, so I’m going to tell docker to use a folder in /home/docker, over using the current folder of /var/lib/docker/. There’s a few ways of doing this, (more methods can be found here), but this is the method I used.
For the directory, I’m going to use /home/docker, which isn’t perfect as it’s a folder in the home directory that means somebody could break things by creating a user called docker. However, as I’m the sole user of this system, I’m ok with using this. However, if this is an issue, a workaround is to create the user beforehand and then disable login.
First, I need to create the new folder and stop the docker daemon:
bash
Then I need to create a docker daemon config file using the command sudo nano /etc/docker/daemon.json and add the following to the file:
json
Then restart the docker service:
bash
I can check the root has changed with the command sudo docker info -f '{{ .DockerRootDir }}' and then just to make sure this works, I run the sudo docker run hello-world command again, and I check the overlay2 folder in /home/docker contains an image, and shows me something like this:
bash
Remote development
Most of the work is going to be done on the Docker host, I want the ability to work on this server in a way that fits into my workflow. While I could force this by using my SSH client or something like Neovim, but I do find development more difficult without a GUI I can drag and drop files around plus paste text from the internet easily. Fortunately, there’s a solution to this in Visual Studio Code and the Remote - SSH extension.
The major benefit to the Remote - SSH extension is that it allows me to use Visual Studio Code in a similar manner to local development, with an SSH client running in the terminal. Theses are the steps I use to get this running:
Firstly, I need to add the Remote - SSH extension to my Visual Studio Code installation. As I had Visual Studio Code already installed, I just needed to open the webpage linked earlier and press the Install button at the top of the page.

While this is downloading and installing, I need to pick a location on the Docker host that I’m going to use as my working directory. In this case, I decided to create a folder in my home directory as this called homelab and as I do intend to manage this with a version control system, I created a top level folder called Source, which is a convention I typically keep to. The command for this would be this:
Note: ideally the top level folder should be something owned by the user you are doing development to avoid having to use sudo as often, the /home/<user> folder is already setup to do this.
bash
At this point, the Remote - SSH extension should be installed, and after rebooting there should now be an option in the sidebar for Remote Explorer. At the top of the new window, use the dropdown to select Remotes (Tunnels/SSH) and press the cogwheel to the right of SSH to pen the config file:
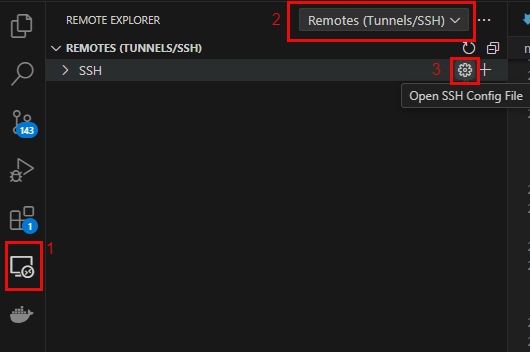
Note: pressing the + will start up a wizard that walks through this process in the command palette, rather than the way I set this up
This should open a command palette to access a config file. I selected the *\.ssh\config folder, but this may be different for you, up to and including setting a custom config location. Then I added the following to this file:
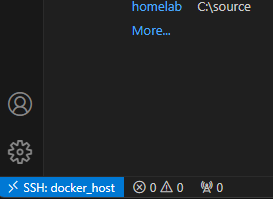
Host docker_host
  HostName 192.168.50.9
  User jack
There should now be an item called docker_host in the remote window that lets me SSH to the machine directly. I then just need to select 1 of the buttons to the right of the docker_host, or right-click and open in a new window:

A new window will open with the command palette first asking me for the installation type, and it’s a Debian host I select Linux:

Then I just need to enter my password and the server connects, as indicated at the bottom left of the screen:
Finally, I just need to setup the folder for easy access and I can do this by going to the explorer in the left bar and clicking Open Folder:
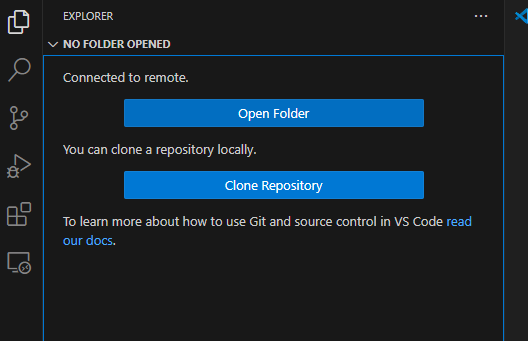
Then in the command palette, I navigate to the folder I want to do development in, and press OK:

I then enter a password to access the folder and then trust it and now everything is setup. This folder is now setup so I can access it directly from the Remote Explorer to get me straight to the folder I want:

When I open the SSH session, I should now automatically open up into that folder so I begin development without having to move around the filesystem.
Notifications
When running a homelab, it can be useful to get notifications from various services about things happening and if a Docker container provides notification support, they can be provided in multiple formats for a variety of systems. Common ones include email via SMTP or Slack, Telegram and Discord via Webhooks. The downside, is that rarely will all of these options be supported and I found that a lot of the more niche containers supported email and 1 other notification system.
In the end I decided to go with Discord as it’s free and I already have an account to use, and is generally easier to setup than email notifications. Additionally, Discord can accept a Slack webhook without additional setup.
For this to work, I created a private Discord server that I can use.
Searching for programs to run
There’s a lot of places to find self-hosted applications around the internet, but here are some of the places I used to find them:
- awesome selfhosted
- first stop for finding pretty much anything
- awesome docker
- useful for more specific docker related stuff
- awesome
- Contains both the above awesome lists and more
- alternative to
- When I see a hosted program I’d like to run in my homelab,
alternativeto can usually pull up something selfhosted
- When I see a hosted program I’d like to run in my homelab,
- r/homelab
- more for hardware than software, but still has a lot of great discussions
- r/selfhosted
- software focussed, mainly around sharing information
- selfhosted-survey apps
- survey of r/selfhosted users for what are the most used applications in their homelabs
- linuxserver.io
- maintains docker images for the community. Includes multiple add-ons to streamline the experience
- selfh.st
- weekly newsletters on updates and a pretty complete list of selfhosted applications
- Various blogs
- if I google anything, the best links are almost always blogposts on personal experiences (and is a major inspiration for why I write all this stuff up)
Closing thoughts
Everything is now setup to actually start running services and I’ve gone thorough all the things I was thinking about before/while I was actually building out the Docker compose files that will form the basis of my homelab. The next set of articles should cover this, as well as how I integrate all my services together.