
Preface
This is the second article in my series on building out a homelab. This article is going to focus on the bare metal, both hardware and software that I’ve chosen to run my homelab on.
I should note, that this article has been written 6 months after I built my homelab, and everything seems to be running well, outside of a few hiccups.
Before Starting
There are a few things I did before spending any money, just to validate that what I was planning to do would work. This included a large amount of research into both what I needed, and what I could run on my homelab to help decide what would work for me. Additionally, I also ran as many of the programs as I could to see if my ideas would work. In order to do this, I converted an old desktop I had into a server to test the base OS I chose and a simple VM to verify everything fitted together. I also ran a large number of the services I was planning to use on my desktop using docker to get some basic knowledge of running these programs and how they would fit together.
Hardware
The last article I wrote had a lot of information about what I was considering for using as hardware in my homelab. There’s a lot of choice, so I narrowed it down on the following criteria:
- efficient
- In the long term, the most expensive part of running a homelab is going to be the running costs, so it was important to focus on for me
- relatively quiet
- I live alone, but the homelab itself has to live in a room I use, so I’d prefer if the noise wasn’t too distracting
- preferably rackmount
- this wasn’t a dealbreaker, but while I’m not considering a rack (yet) I am planning to get one in the future, so the ability to rackmount the hardware to some degree would be good
- at least 6 hard drives, with the possibility of expansion
- I can use a HBA to expand, so it would need PCIE slot space if this isn’t possible directly off the motherboard
- capable of running ZFS
- frankly, this is more of a software consideration than hardware, but does mean I won’t be looking for a RAID card
- ECC compatibility
- I’m unlikely to use this straight out, unless the system already comes with ECC RAM, but it would be nice to expand to this in the future
- longevity
- I’m planning to run this server for a long time, so I want something that offers me a decent run time
- within budget
- I set a loose budget of £1000 to get everything I needed
- at least 32GB of RAM and 8 CPU cores
- I’m planning to run at least 3 virtual machines, which requires a few cores to work.
- It has integrated graphics
- This means I didn’t need to grab a GPU, or figure out how to do a headless install of the OS, I could just plug a HDMI cable into the motherboard
My Choice
I spent quite a while agonizing over this, but in the end I went for a consumer AMD platform as I could get the parts easily, I could benefit from more modern CPU’s and it has the advantage of being able to accept ECC RAM (with some caveats). Additionally, while there are configurators offered by some manufacturers, I could more easily select exactly what I wanted with fewer concerns about compatibility due to less proprietary cables etcetera. I also gain the benefit of more modern PCIE architecture, allowing for the use of NVMe drives, which would be difficult with Xeons from the late 2010s.
I do have some concerns about future reliability as desktop chips are technically not designed to run 24/7, but I’ve also not experienced
The specs of the machine I finally built out are as follows:
- Ryzen 9 7900
- This CPU offered near unbeatable performance per watt without spending thousands and has a respectable 12 cores, which should provide me with enough overhead for what I want to run. Additionally, I do have room for expansion in the future if I need to, as the AM5 socket is new and AMD is known for reusing sockets across a few generations. I also have experience with a similar chip as my current desktop runs a 7900x, which is really quiet and been rock solid for the past year.
- A pair of Seagate Exos 16TB X16 drives
- This was the minimum amount of storage I wanted to run in my build, and while I’ll discuss my ZFS setup in more detail later, this will allow me to run a reliable and expandable storage pool
- a pair of 32GB DDR5 memory, totalling 64GB of RAM
- This can be expanded later if I need to as I have additional DIMM slots free if needed, and the speed of this RAM is frankly overkill, but my homelab is extremely snappy within my network.
- A pair of 1TB NVMe drives
- these will be used as boot drives, and running the base VM’s that I have. I just went for fairly cheap Gen4 drives from a manufacturer I recognized (Crucial)
- 850 watt gold power supply
- I thought about getting platinum 750W power supply, but I honestly found a great deal on the one I had, so went for that instead
- Phanteks Enthoo Pro Midi-Tower
- While this case is not rack mountable due to being 21 inches tall, it can fit a huge number of drives internally, is easy to work in and has a large fan for cooling, which common logic says should run quieter than several smaller fans
- MSI X670E Gaming Plus Motherboard
- I obviously don’t care about the gaming branding on this motherboard, but it’s a pretty cheap X670E board, which offered additional PCIe lanes to an X670 board. I did initially order an ASUS motherboard due to explicit ECC RAM support, but had to RMA it and that soured me on getting a replacement.
Issues
Honestly, I’ve been pretty happy with my choice over the last 6 months and I’ve not run into any major issues, though actually building the computer was a pig. I had to eventually RMa both the motherboard and the RAM as faulty, but I got there in the end.
For the motherboard, I just couldn’t get the system to POST without errors and the RAM was even more insidious as everything would work fine, before launching a number of services where if the bad sector was used, the computer would suddenly crash. I eventually diagnosed this using Memtest86+
Operating System

There’s a lot of choices for OS that I looked at, from Linux to FreeBSD to Windows Server. I ultimately decided to go with Proxmox, which is a hypervisor built on top of Debian to run my homelab. The reason for this are as follows:
- I have a lot more experience with linux than FreeBSD
- It’s built on top of Debian, a well known and supported Linux distribution
- I want to run all of my actual applications in separated virtual machines, and while it’s possible to do this on other base operating systems, this is built in as the actual reason to use this OS
- Essentially everything (including SSH) is available via a web UI, meaning I don’t need to physically interact with the machine
- On multiple occasions I’ve made changes to proxmox from my tablet or phone via the web browser (there’s also a mobile app available). This is great when I want to be lazy
- Proxmox is heavily integrated with ZFS and support for the file system is mature
- Proxmox can cluster disparate servers so if I decide to run more servers, I can see and manage all my Proxmox instances from a single interface
- While it’s possible to manually install Proxmox on Debian, there’s an installer that makes life easy
- Snapshot and backup features are built in
I do need to point out that there are alternative hypervisors to Proxmox like ESXi, but I discounted this due to ESXi charging license fees for features I get as standard in Proxmox.
Prerequisites
On top of the server itself, you’ll need the following:
- USB drive
- Used for creating a bootable disk. This drive will be wiped during the flashing process, so make sure there’s nothing on it you don’t want removed
- A domain you own
- This isn’t 100% necessary, but I’m going to be using 1 to allow me to access my services internally by URL. If you’re happy using IP addresses, then this isn’t needed. You can get a domain from somewhere like Namecheap, but I personally used the Cloudflare domain registration service as I’m using Cloudflare to manage my domain. My latest renewal bill came out to under $5 for a
.co.ukdomain. - This guide isn’t going to focus on it, but if you can’t afford a domain, there are services out there like Duck DNS
- This isn’t 100% necessary, but I’m going to be using 1 to allow me to access my services internally by URL. If you’re happy using IP addresses, then this isn’t needed. You can get a domain from somewhere like Namecheap, but I personally used the Cloudflare domain registration service as I’m using Cloudflare to manage my domain. My latest renewal bill came out to under $5 for a
- Keyboard, monitor and mouse
- used for initial installation of the OS. Once this is complete, these aren’t necessarily required anymore
Setup
I’m using a mixture of my running proxmox instance and a VM on my desktop to demonstrate setup, so there might be some small inconsistencies in resources.
If you’re testing proxmox before committing to using the software, there are some instructions in the Proxmox wiki found here, but the main thing to remember is to set the Networking mode to Host-only so you can access the web UI.
Installing Proxmox
First you need to grab the latest version of Proxmox from their website, found here. at the time I setup my homelab, I was using Proxmox 8, which is running on Debian 12, also known as Bookworm.
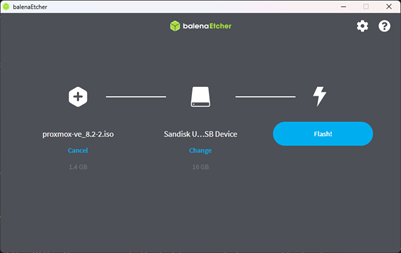
You’ll also need Balena Etcher to get the ISO onto a USB stick. This is quite straightforward, all you need to do is select the ISO that was downloaded and the USB stick you want to flash and Balena Etcher will do the rest.
At this point, everything should be ready to setup, so all you need to do is plug the USB into your computer, access the BIOS and boot from the USB stick. After this you should be greeted by something like the below:
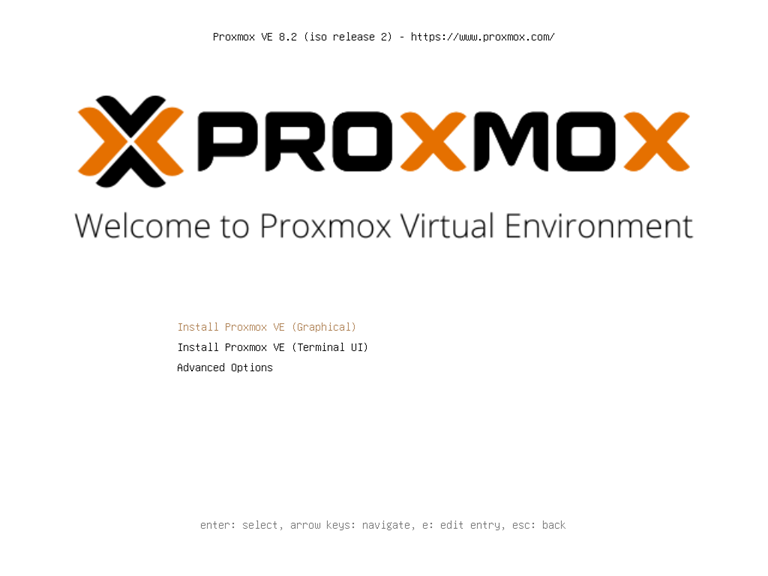
For this I’m going to use the first option to install Proxmox graphically, but you can do things like use memtest86+ from the Advanced Options menu if required. You then need to accept the EULA and select the hard drives and file system you want to use.
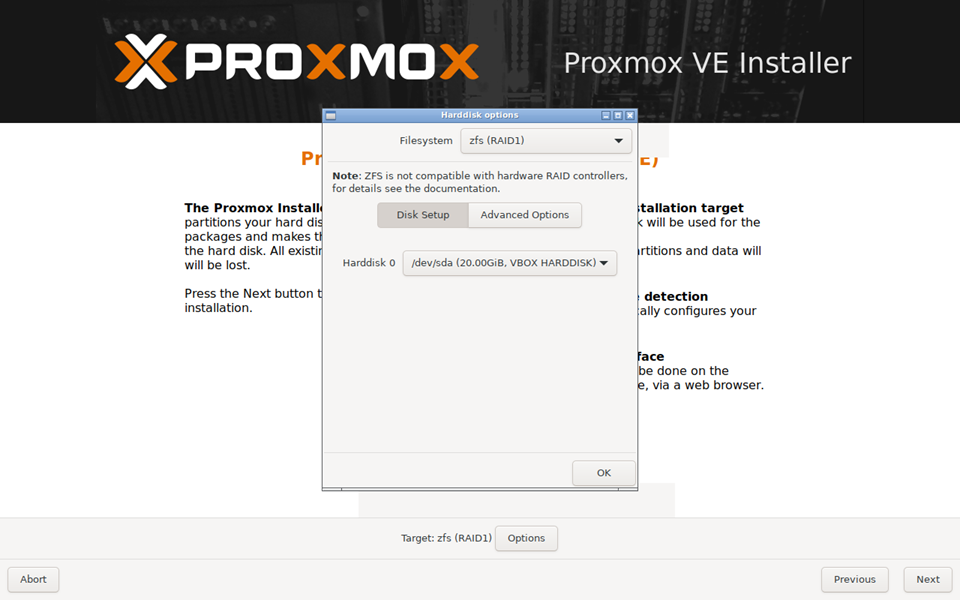
It’s really important that you get the setup right on this as it’s how the base OS is going to be configured for the OS. As I’ve mentioned previously I’m using ZFS, but in particular I’m using an architecture called mirrored VDEVs. This is where every disk in the system has a mirror. This setup allows for maximum reliability as any individual disk that breaks will not cause any storage loss as every disk in the system has a redundant copy. The downside to this approach, is that you need to buy double the storage.
There’s a really good article on the different ways to setup a ZFS array and why you should use mirrored VDEVs anyway here
While this is less relevant for boot drives, mirrored VDEV’s provide the lowest number of drives required to expand a ZFS storage pool, where ZFS organizes drives into pools of multiple drives that present as a single volume, commonly called a tank. These drives are not individual drives (unless you want to lose all your data when a drive fails), but in an array like a mirrored VDEV or RAIDZ1 etcetera. You can add these drives to the tank whenever you buy new hard drives, and anything other than RAIDZ0 and mirrored VDEV’s requires at least 3 drives. This will change in the future with RAID-Z expansion, but as of writing, this is still under development and isn’t available in a mainstream release.
In order to change the file system, hit OPTIONS > zfs (RAID 1) and select the 2 disks you want to use as boot drives:
NOTE: I’m using virtual box to demonstrate this, so only have a single hard drive available, when installing this for real, I’d selected the 2 NVMe drives II’d bought.
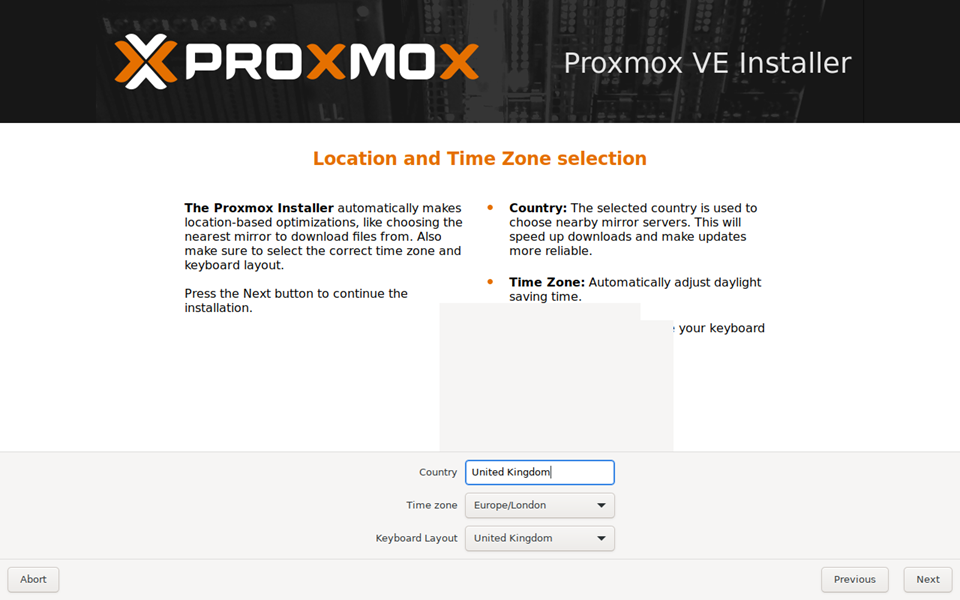
Then select country, time zone and keyboard layouts. I’m in the UK so selected my appropriate values:
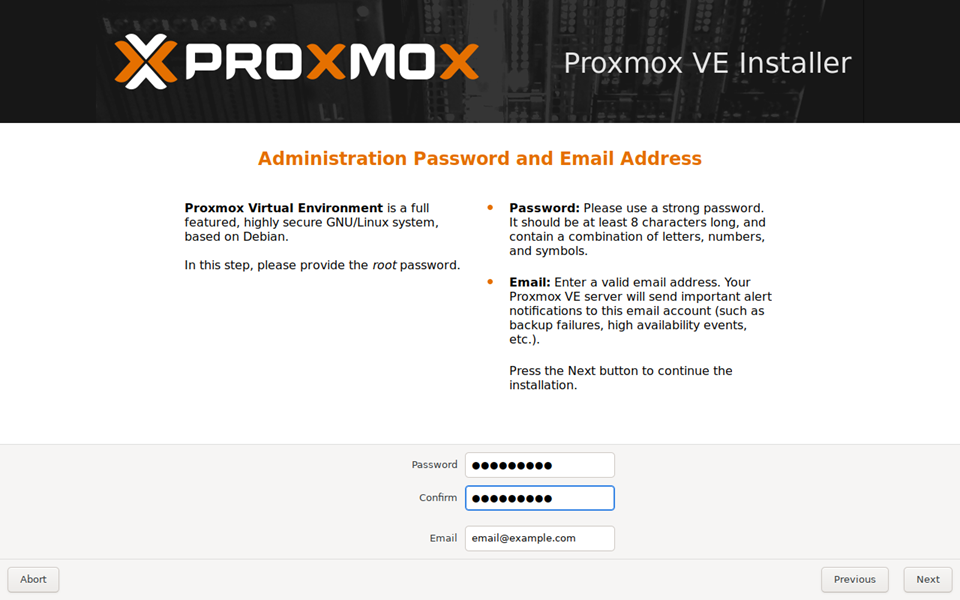
Then setup an appropriate password for the root user and an email address:
You’ll then be taken to screen to setup the network and FQDN. Most of these settings will be filled out for you, but make sure the IP address is something you can afford to be static if you have DHCP. For myself I’d set a range of IP’s that are static (and thus not handed out by DHCP) in my router build. Set the FQDN as something easy to remember, but preferably not within the domain you’ve purchased. I went with pve.example.local
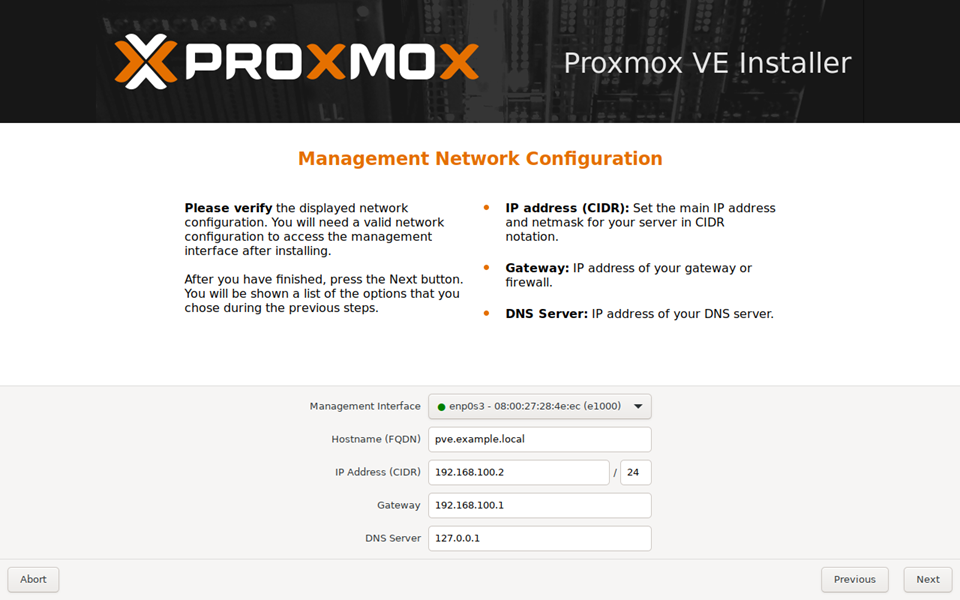
NOTE: the DNS settings in the above screenshot would need to be updated to an actual DNS, rather than localhost
You then should get a screen confirming your choices, just read over it and make sure everything is correct before hitting Install and then wait for the install to complete.
Once the install is complete, you can remove the USB drive from the system and Proxmox should boot into a terminal and a link to where the web UI is available. In the case of this installation, it’s 192.168.100.2:8006. You should no longer need the monitor, keyboard and mouse and can go back to your main computer, that is on the same network as the Proxmox server and enter the IP and port into your browser. You should see the web UI come up with a login screen:
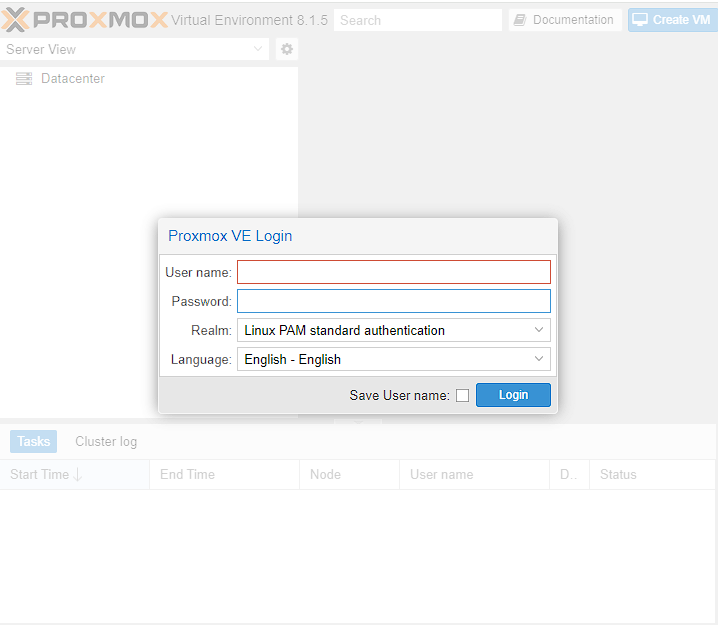
The username will be root and the password will be whatever you set during installation. Make sure the Realm is set to Linux PAM standard authentication as well.
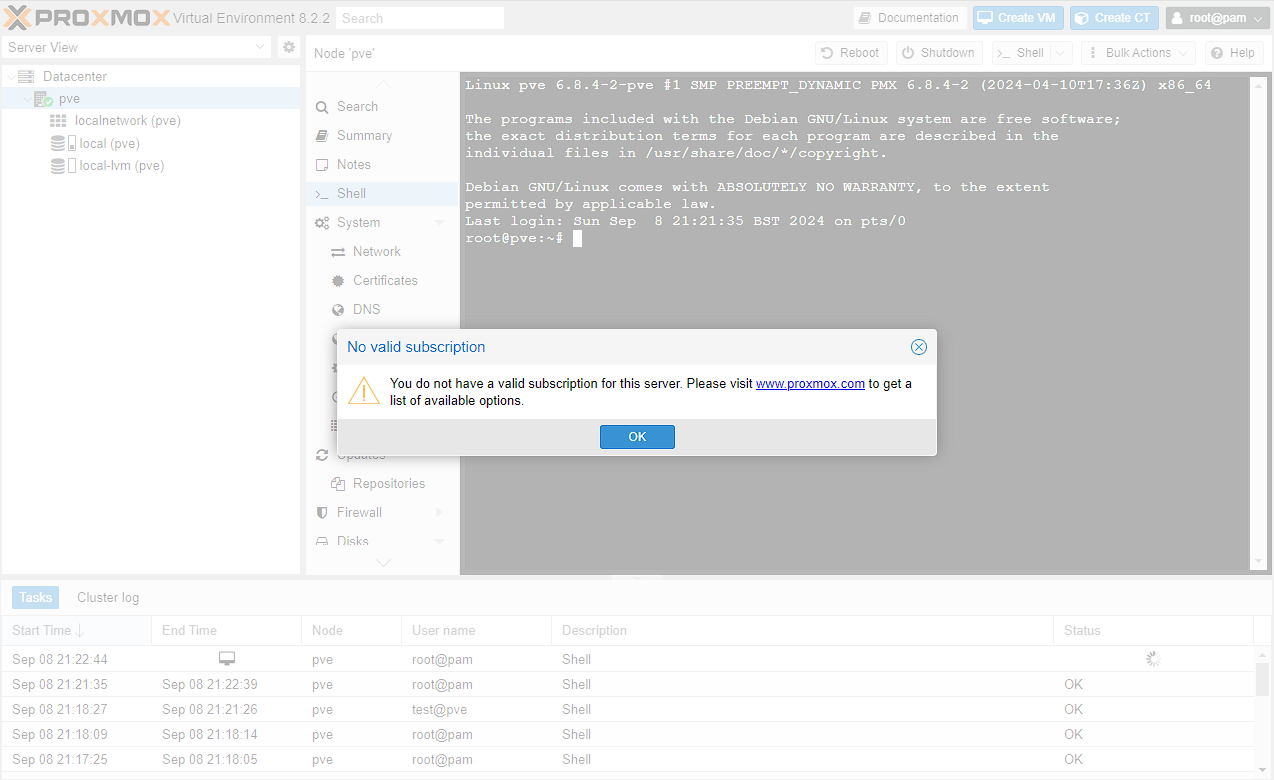
Once logged in you should see 2 things on left hand side navigation window, Datacenter and a node called something like pve. Datacenter is used to manage Proxmox itself for things like users and backups etc, whereas pve contains details of the machine, including summaries and access to a shell.
Initial setup
Once we’ve got access to Proxmox, you should see an annoying banner warning you about not having a valid subscription.
You should also see, if you go to Datacenter -> pve -> repositories, that there’s a warning about using enterprise, if you don’t have a subscription:
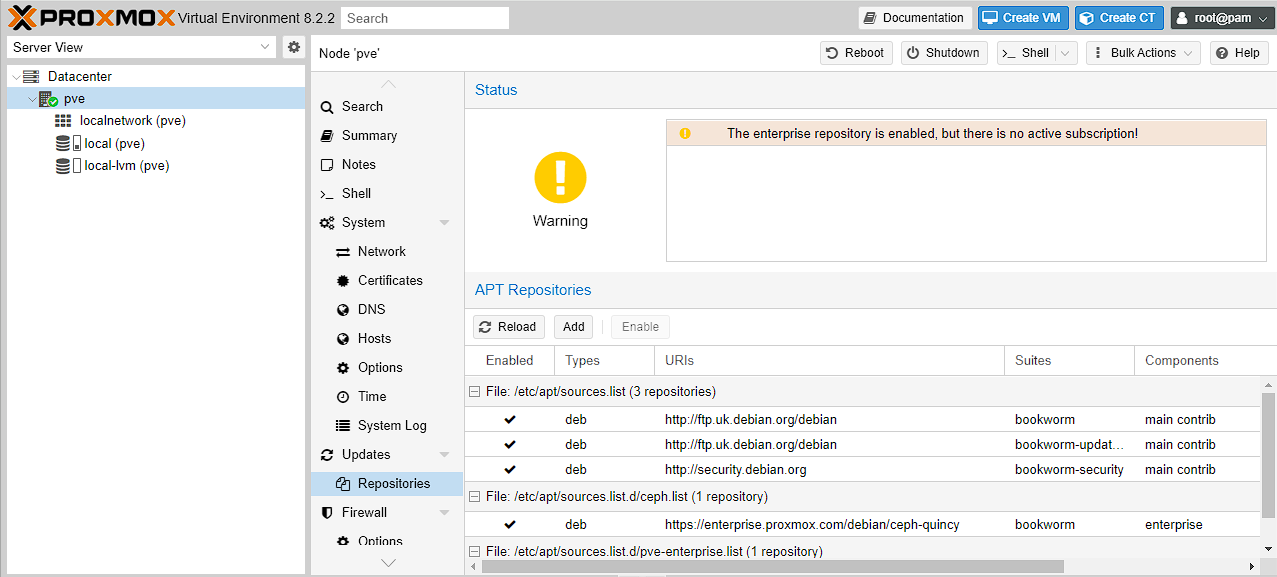
This is absolutely true, but if you don’t have a license, we can get this banner to go away through a few commands, and moving from the enterprise repositories, (which are set by default) to the community ones.
NOTE: These steps are specific to Proxmox 8, if you’re not using version 8, you might have to find the specific commands for that version.
There’s a much more comprehensive set of instructions here that includes how to do PCI passthrough among other things, but for the purposes of this guide I’m just setting the correct repositories and removing the warning message on login.
First up we need to add the community repositories to our sources:
bash
Note: if you’ve not used nano before, saving and exiting a file is done with ctrl + o and then ctrl + x
then add the community repositories:
bash
we then need to disable the enterprise repositories for Proxmox and Ceph, by commenting out the deb lines in the following files:
bash
bash
For some context, Ceph is a distributed file system used by Proxmox clusters. As I’m only using a single node, I’m not actually using it, but it’s good idea to disable the enterprise repositories as a matter of course.
Removing the popup is as simple as running the following command, which is essentially removing the message from the JavaScript that runs on login:
sed -Ezi.bak "s/(Ext.Msg.show\(\{\s+title: gettext\('No valid sub)/void\(\{ \/\/\1/g" /usr/share/javascript/proxmox-widget-toolkit/proxmoxlib.js && systemctl restart pveproxy.service
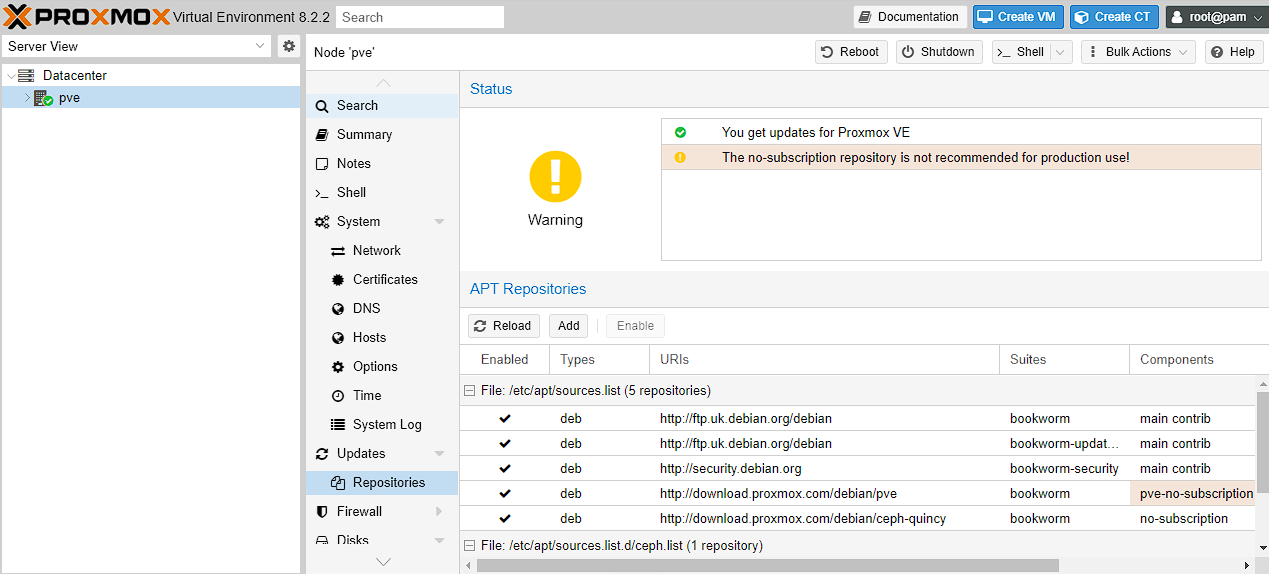
Now you just need to restart proxmox, and you should not get the message on log on. Additionally, if you go to Datacenter -> pve -> repositories, the warning around enterprise usage, should be replaced with one for not using no-subscription repositories in production (along with updates being enabled):
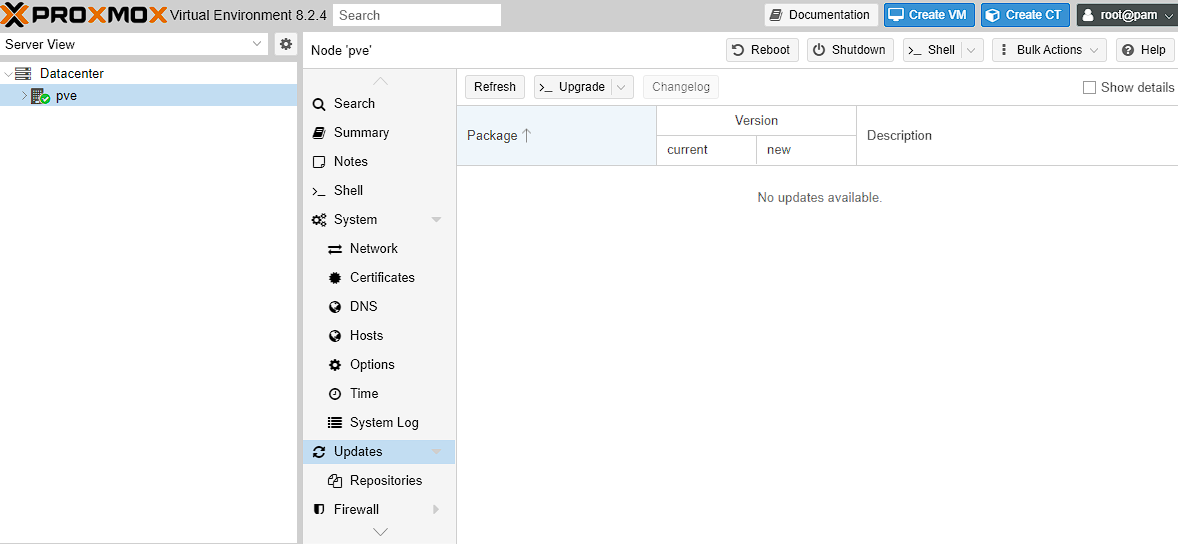
At this point I then make sure Proxmox is updated to the latest packages etc:
bash
you can alternatively do this via the web UI by going to PVE -> Updates, then selecting Refresh, followed by Upgrade:
Setting up the ZFS storage pool
As part of my setup I have a couple of additional disks I’m using to store various files and data, which are separate from my boot disks. As I’d mentioned earlier, I’m using mirrored pools as they’re easy to expand when required.
While it’s possible to create a ZFS pool via the console, it’s pretty straightforward to create via the Web UI, so that’s how I normally do it. There are more detailed instructions on how to do this found here, or alternatively a far more comprehensive video of these steps here
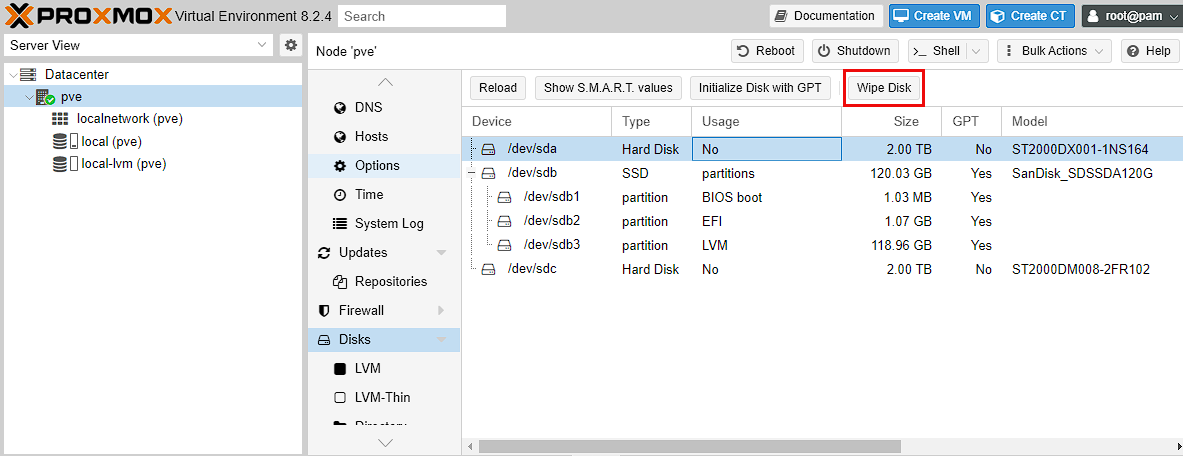
To start with, go to Datacenter -> pve -> Disks and make sure all the drives that you want to use in this new pool are wiped. Just make sure not to wipe the drives you’re using as boot disks.
Then go to Datacenter -> pve -> Disks -> ZFS and select Create:ZFS and fill out the values. For myself, I’m calling the pool tank as this is a pretty standard name for a ZFS pool. Then, in keeping with my storage goals, I’m selecting Mirror, and the 2 drives I want to turn into a ZFS pool. I’ve disabled add storage, and I’ve selected a Compression of lz4, which will provide more efficient storage, at the cost of some CPU.
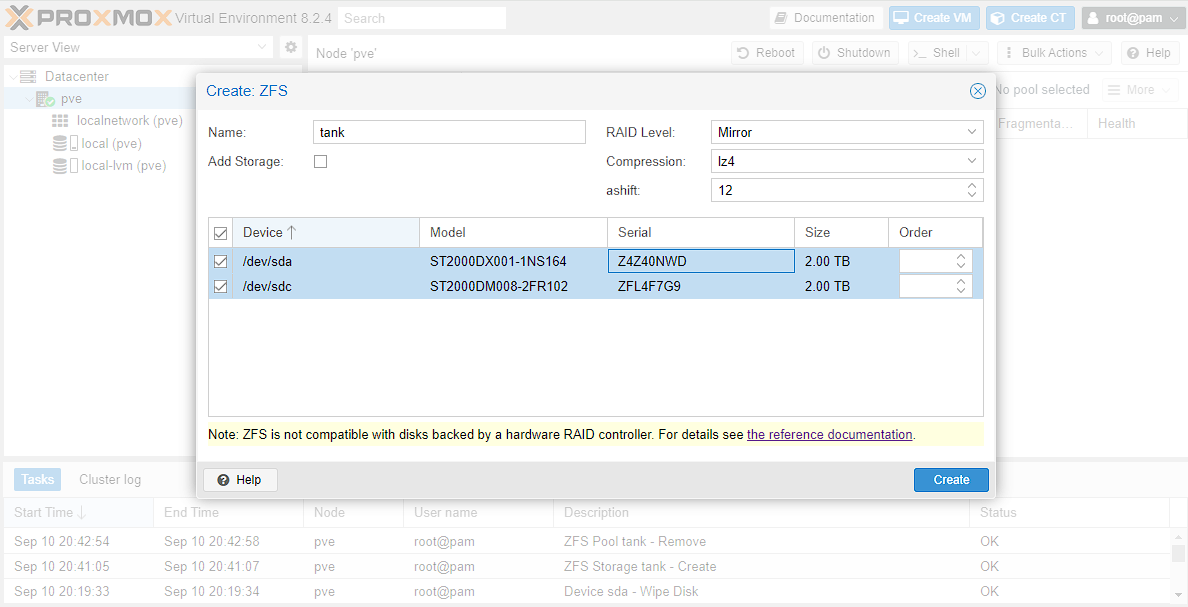
I can then test this pool is active, by logging into the shell and using zpool list. This should output the pool that has just been created. Next I’m going to create a set of ZFS directories within this drive with the below commands.
NOTE: my pool is called tank, and so has a mountpoint of /tank. It should be the name of the created pool, but you can run zfs list to get the mountpoint if you’re unsure.
The next step is to create a set of file systems that I’m going to use to build out a set of directories. The big benefit of doing this, is that each of these file systems shares the underlying storage pool, while separating out the directories to use based on need:
bash
You can then view that these have been created by using the zfs list command.
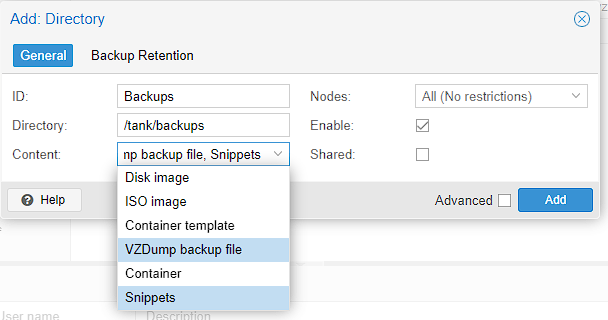
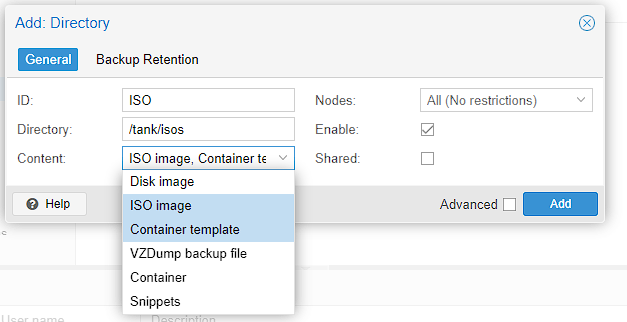
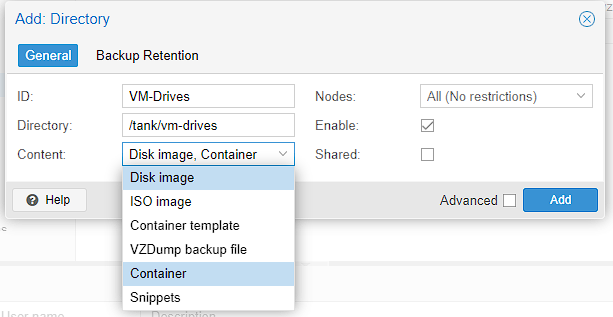
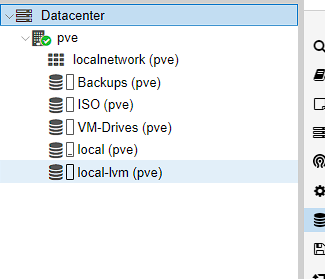
At this point, I now need to let proxmox know about these directories, so I go to Datacenter -> storage and begin adding them by going to Add -> Directory
backups:
iso images:
virtual machine drives:
You should now be able to see these directories in the explorer on the right, below pve:
Backups
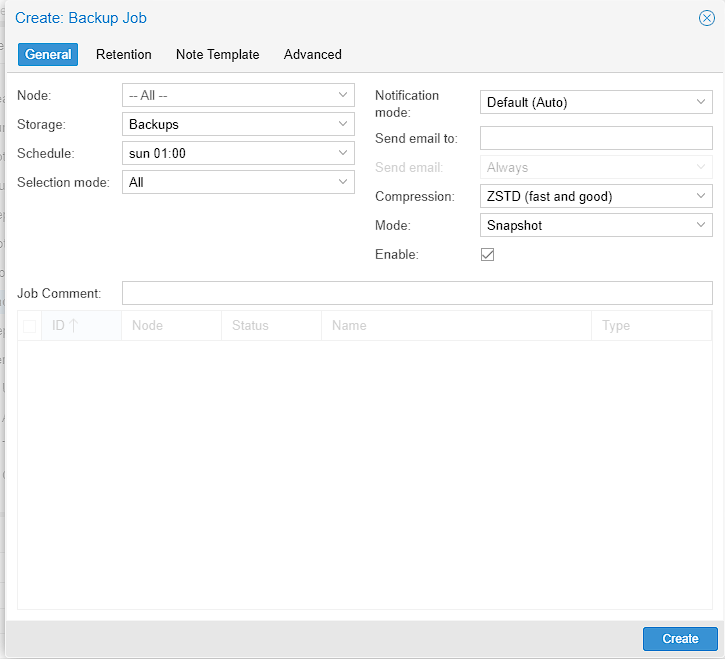
While it’s not particularly useful yet, it’s a good idea to setup a backup schedule in Proxmox for your various virtual machines etc. In order to do this, we got Datacenter -> Backups and click Add.
Make sure the new directory that has been created is selected in Storage, set a Schedule you like, for me that’s a weekly backup early on Sunday. Then select what you want to backup, for now I’m just selecting All, but this can be modified if there’s something that you don’t want backed up.
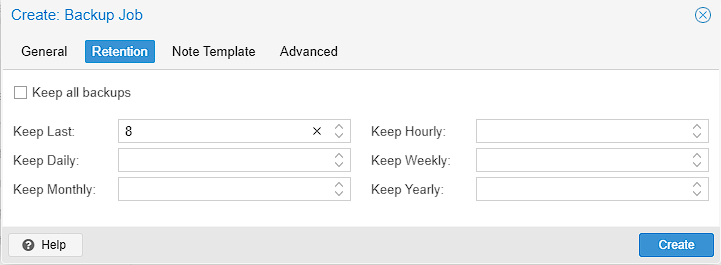
Then switch to the retention tab, and set how many backups you want to keep, I chose 8 to keep 2 months worth of backups on hand.
Then just select Create, and the backup schedule should be created
User setup
It’s usually not considered a good idea to run as the root user, so this is the process for setting up a user to use in Proxmox. It’s not really necessary for a homelab, but I do it out of habit
Realm
When creating a user for Proxmox, by default you can set either a realm of either Proxmox VE authentication server or Linux PAM standard authentication. The difference between this is that the Linux PAM standard authentication is a standard user created by Linux commands which Proxmox is then made aware of, whereas Proxmox VE authentication server is a user created only for the Proxmox web UI. The difference, is that the only Proxmox user cannot use SSH or similar commands to access the underlying machine, whereas the standard Linux user can. However, provided you’ve set permissions correctly you can do things like reboot machines etc. As such, the next section is only relevant if you want to create a PAM user. If you’re ok with just a Proxmox user, skip to the section afterwards.
Linux PAM user
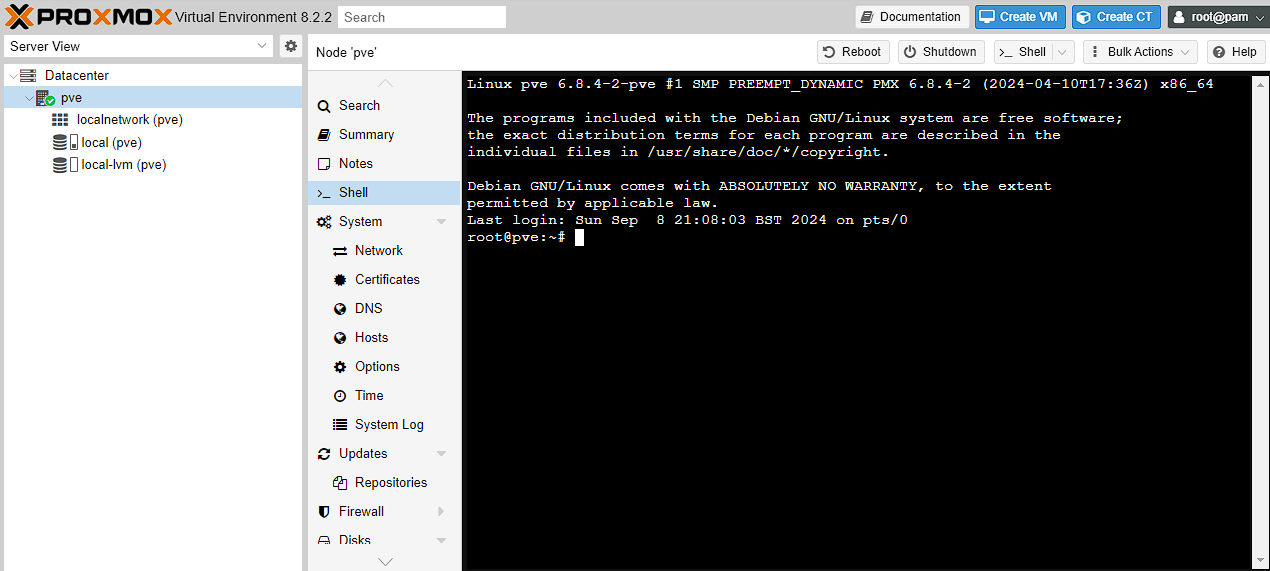
As the root user, head to pve -> Shell, and you should see a standard Linux shell opened. Alternatively, you can use a favoured SSH client. If you’re not logged in as the root user automatically, do this now.
Now we’re just going to run the standard linux commands to create a user:
bash
Proxmox VE Authentication Server
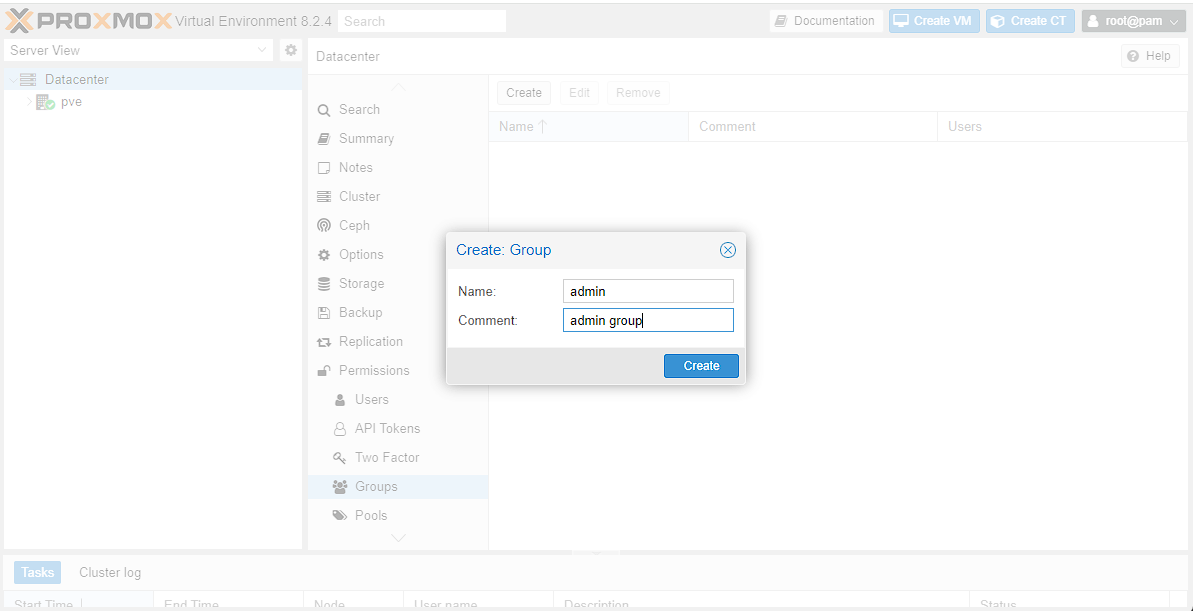
At this point, we can create a user in Proxmox itself. To start with I created an admin group by going to Datacenter -> Permissions -> Groups and creating an admin group:
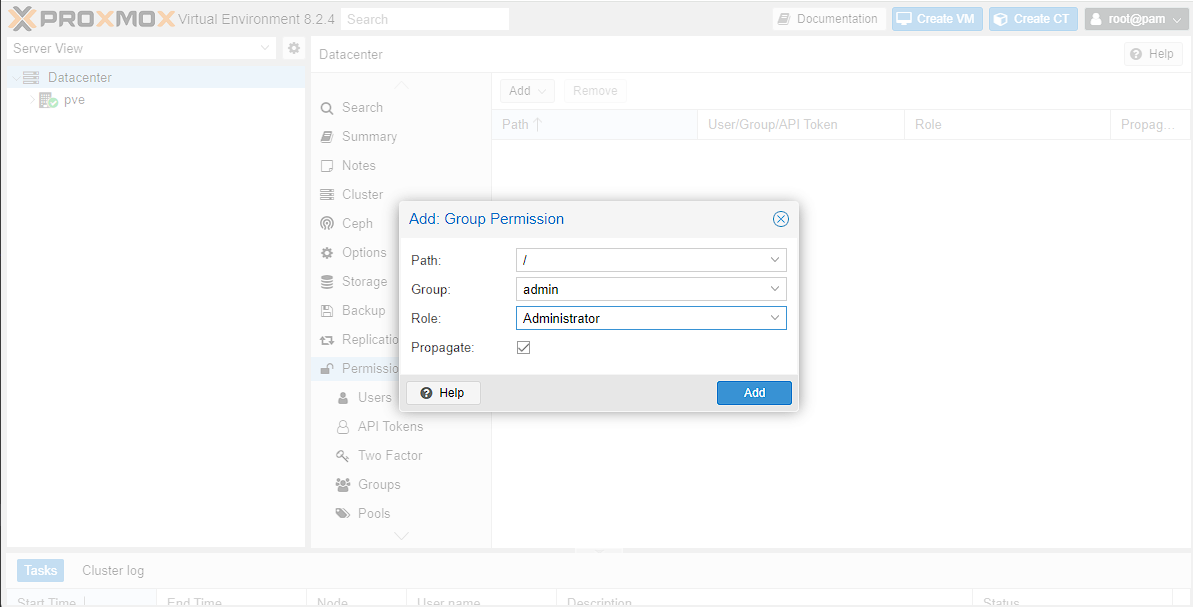
Then I need to assign permissions to this group by going to Datacenter -> Permissions then selecting Add -> Group Permission. As I’m creating an admin group, I’m going to give access to everything by setting the Path to /, selecting the Group I created and the built-in Administrator Role.
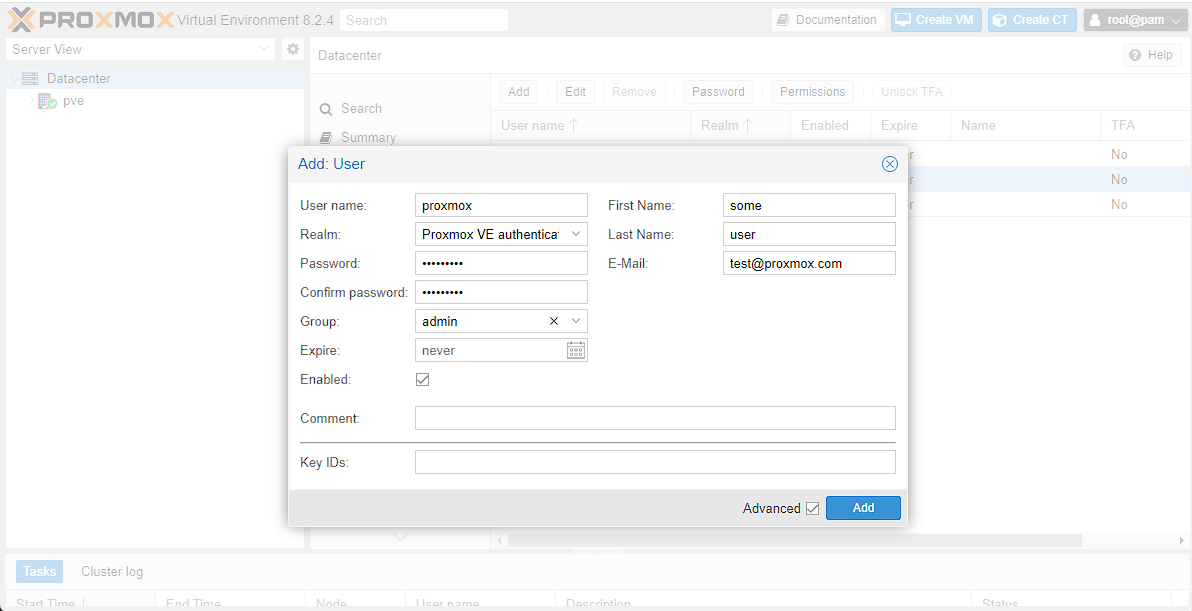
The final step, would be to assign these permissions to the new user, which I can do by going to Datacenter -> Permissions -> Users. If you’re checking this for the first time, there should be a single root user here already. At this point I’m going to go to Add, make sure I’m using the correct Realm, and then fill out the fields required, then click Add.
NOTE: if you’re using PAM authentication, the username should be the same as the user you created, and you won’t be asked to fill out a password as this has already been done.
At this point, you should be able to log on as the new user, and you should see the proof of this in the top right corner of the screen, where it shows your username.
If you’re using PAM, there are some limitations in the web UI which would require root access to the machine, for example, I can’t update/upgrade my server outside the root user, unless I use the console, and it’s the same with creating ZFS pools.